We have a bit of an "space-issue" here in our house. I feel like I'm constantly organizing and reorganizing closets, drawers, and cupboards. It's hard to believe that we before our lovely home here in Indy we were living in a 800 square foot brownstone in Boston that literally had no halls! It's a constant struggle/battle and little by little we are getting things under control. The latest battle area was Lo's room. As she gets older she is needing her own space more and more, but as she gets older she seems to have more and more! It was time to get things under control. I often joke that it won't be long before I see her on an episode of Hoarders...but really I'm not totally joking! How one small child can have some many small, useless things is beyond me.
Here is the situation before the intervention:
This is her desk (awesome Goodwill find that will be redone once the weather cooperates)
Her already tiny closet where we crammed her armoire to give her more floor space in her room.
Her dresser and hutch. My helpful advice for those looking for baby furniture...don't buy baby furniture! It's only useful when you have a baby. Once they get bigger it's no longer practical. The top drawer looks big but it is ridiculously shallow and serves no useful purpose.
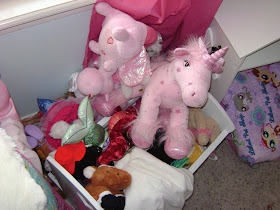
Lo also has an serious obsession with stuffed animals and they are taking over our lives. This is just a small sample. We actually have 3 plastic bins, one large basket and a laundry tub full of them in our playroom.
This is her bookshelf
Before we even started we headed to the dollar store to get some colorful storage bins. I really wanted Lo to be part of the whole process. It would have been much easier without her, with much less crying and whining (from both of us), but I wanted her to start taking responsibility for her things.
This is Lo in the painstaking task of deciding which things to keep and which to toss. Literally we fought over EVERY item. There was a lot of, "But it's my most favorite toy ever."
She only has two wrists...how many silly bands does one little girl need?!?!?
Four hours later we could see the light at the end of the tunnel!
Closet organized and too small clothing removed-Check!
All Polly Pockets, Squints, My Little Ponies, Barbies and Littlest Pet Shop toys organized-Check
Find a purpose for ridiculously small top drawer-Check
Bookshelves organized-Check
Ahhhhh....so much better! Not sure how long the wonderful organization will last, but for now it's heaven.
Pages
▼
Saturday, April 30, 2011
Friday, April 29, 2011
Dandy-lions
To my 5-year-old dandelions are the most beautiful flower in the world (Her daddy sees them as the destroyers of his perfect lawn). She goes up and down the sidewalk in our neighborhood picking and blowing each and every dandelion she sees. I tried to explain to her that they are weeds and that the neighbors really don't want her blowing the seeds in their lawns, but that only seemed to motivate her even more. She has since been on a one girl mission to single handedly increase the dandelion population tenfold.
A few days ago we were in the car and came across a field of dandelions that looked like this:
She looked a me with pride and proclaimed, "See! It worked!"
Oh how I love her!
A few days ago we were in the car and came across a field of dandelions that looked like this:
She looked a me with pride and proclaimed, "See! It worked!"
Oh how I love her!
Thursday, April 28, 2011
Aunt Darla's Pasta
My MIL has 3 sisters and when my hubby lived on his own for the first time they gave him the most thoughtful gift. Together, with their mom, they put all their favorite recipes in one spot and made him his very first, and to date, only, cookbook.
This one from Aunt Darla is one of our most favorites! Not only does it taste wonderful, but it can be made in 10 minutes. No joke, in 10 minutes your whole family can be sitting down having dinner together. I don't think fast-food is that fast!
Ingredients:
- 1 box Penne Pasta
- 3 or 4 shallots
- 2T EVOO
- Thyme
- 1 can of chicken broth (stock would be wonderful too)
- 2 gloves of garlic, chopped
- 1 package of crumbled feta cheese (I use the reduced fat)
- 1 jar of sun dried tomatoes packed in oil*
**Please, please, please make sure you get the julienned tomatoes they will make your life so much easier. For some weird reason you can usually find the sun dried tomatoes in the produce aisle, typically next to the garlic in the jar. My jar looked like this:
Directions:
- In a large sauce pan or skillet, saute the shallots and garlic in olive oil
- Cook pasta according to the instruction, al dente
- Add chicken broth to the shallots
- Add 1-2t of thyme (fresh or dried) and sun dried tomatoes. Heat throughly, it's okay if it boils slightly
- Once pasta is cooked, drain and add to shallot/tomato mixture. Mix well
- Add crumbled feta and toss to coat
- Serve with shredded parmesan cheese
Super easy and DE-LISH!
At the bottom of the recipe Aunt Darla wrote this: If you cook nothing else in your life, make this pasta.
So listen to Aunt Darla and MAKE THIS PASTA!
Wednesday, April 27, 2011
Sewing, sewing, sewing...
If you need me today I'll be here:
I've got quite a few custom orders (YAY!) and a big, fun weekend coming up.It's a dreary, rainy day here in the Midwest which makes it a perfect day for locking yourself in your crafty room and letting your children abuse their TV privileges.
Fingers crossed the girls cooperate-though it's only 9:30 in the morning and we've had 5 melt-downs and 1 time-out so it doesn't look too promising...so how about fingers crossed I keep my sanity!
Happy Wednesday!
Tuesday, April 26, 2011
How To Make Your Own Cake Stands and Chip/Dip Platters
Last week I turned these fabulous Goodwill finds into great party platters. All for under $3 plus the cost of spray paint.
You can pretty much find tutorials on how to make them all over Bloggerland. I found so many different types, the possibilities are endless.
Look at this adorable set from The Mother Huddle.
Or how about this great tiered stand from Cupcakes and Crinoline.
 The inspiration for my stand came from The Crafting Chicks. I loved the idea of a bowl on top for dip and then a place for crackers or bread on the plate below.
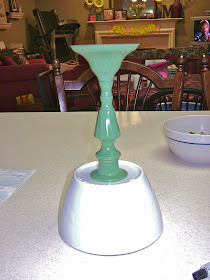
I started by spay painting my metal candlestick (that only cost me $0.49 at Goodwill). I liked that the top was flat so that I had a good place to put the glue.
I used my E-6000 crafting glue for this project. You can find it at your local craft store.
First, I glued my bowl (also $0.49 at Goodwill) to the top of the candlestick.
After letting it dry I little bit I glued the bottom of the candlestick to the top of the plate. I didn't find any plates I liked at Goodwill so I bought this new one at the store for $2.
It was at this point that I got a little impatient...I kept checking on the glue to see if it was really working. I didn't think it was so I put a "little" Gorilla Glue on the bottom...then the glue proceeding to leak ALL OVER THE PLATE...next time I will just relax, have a glass of wine and WALK AWAY.
See my oozing mess???
It actually came out okay, I was able to peel it off and you couldn't see the gluey mess anymore.
Ta-da!
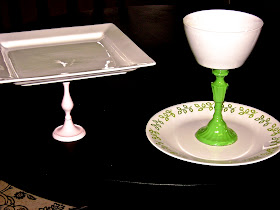
Not too bad for my first try. I think it will be perfect for our next crafty night. I see it full of hummus with lots of fresh veggies on the plate.
I also painted another candlestick pink and used this great square plate I had on hand. I think it'll be perfect for cupcakes or scones.
Overall I think this project has lots of potential and I will definitely be on the look-out for cute plates and candlesticks on my weekly (or daily) trips to Goodwill!
As always if you try this project out please send your pictures my way-I'd love to see them!!!
You can pretty much find tutorials on how to make them all over Bloggerland. I found so many different types, the possibilities are endless.
Look at this adorable set from The Mother Huddle.
Or how about this great tiered stand from Cupcakes and Crinoline.

I started by spay painting my metal candlestick (that only cost me $0.49 at Goodwill). I liked that the top was flat so that I had a good place to put the glue.
I used my E-6000 crafting glue for this project. You can find it at your local craft store.
First, I glued my bowl (also $0.49 at Goodwill) to the top of the candlestick.
After letting it dry I little bit I glued the bottom of the candlestick to the top of the plate. I didn't find any plates I liked at Goodwill so I bought this new one at the store for $2.
It was at this point that I got a little impatient...I kept checking on the glue to see if it was really working. I didn't think it was so I put a "little" Gorilla Glue on the bottom...then the glue proceeding to leak ALL OVER THE PLATE...next time I will just relax, have a glass of wine and WALK AWAY.
See my oozing mess???
It actually came out okay, I was able to peel it off and you couldn't see the gluey mess anymore.
Ta-da!
Not too bad for my first try. I think it will be perfect for our next crafty night. I see it full of hummus with lots of fresh veggies on the plate.
I also painted another candlestick pink and used this great square plate I had on hand. I think it'll be perfect for cupcakes or scones.
Overall I think this project has lots of potential and I will definitely be on the look-out for cute plates and candlesticks on my weekly (or daily) trips to Goodwill!
As always if you try this project out please send your pictures my way-I'd love to see them!!!
Monday, April 25, 2011
Ugh...pre-washing fabric
Today's lesson is on prep work. Now I'm going to be honest...this is not a "rule" I always follow but I am REALLY trying to be better about it. I know it's a total pain, but you really should wash your fabric before sewing! I know, I know...I can hear you protesting (I'm protesting too!!!), but it's really the "right" thing to do. My new rule is that when I bring fabric home it goes straight to the wash so that when inspiration strikes it's ready.
When you come home from the fabric store you are given this beautiful stack of crisp new fabric that looks like this:
It's so pretty...so stiff...so easy to work with....BUT...still it's a great idea to pre-wash your fabric. Now for a moment of truth...do I ALWAYS wash before sewing? No, but I've had way to many outfits for the girls no longer fit because the fabric shrank in the wash.
So...after a spin in the washer and dryer you get a lovely ball of fabric like this:
And the ends will be all frayed like this:
If the strings are tangled or just bother you it's okay to trim them, but not really necessary.
So what do you do next?
This:
I know...I hear more protesting...like what any of us really wants to do is more laundry and ironing, but in the end it's totally worth it! Just park your iron in front of the TV and watch your "stories" and in no time you'll be done.
And when you're done you get a beautiful pile of fabric that closely resembles your first stack.
Pretty, crisp and ready for the next project!
Sunday, April 24, 2011
Easter Fun
Every Easter I boil about 2 dozen eggs...if I'm lucky I get to dye one or two. This year I decorated a record 2 eggs. I love that the girls (and Daddy) find it so much fun! This year the girls were VERY into the whole process and really took their time. We could have easily dyed 3 dozen eggs if we had 'em.
It's always fun to guess what color the dyeing tablets will turn into. The girls thought it was so funny that the orange tablets turned into green dye.
NoJo really liked sponge painting hers (probably because it was really messy).
It was clear who the messy artists were...and who were not...
Such a fun family activity
Happy Easter to you and we hope EB brought you lots of fun (and crafty) treats!!!
It's always fun to guess what color the dyeing tablets will turn into. The girls thought it was so funny that the orange tablets turned into green dye.
 |
 |
| The vinegar was a little stinky! |
 |
| So excited to final start. |
Lo preferred the dyeing method and Nate had fun showing her how to make stripes and how to use the "magic" crayon to write her name.
NoJo really liked sponge painting hers (probably because it was really messy).
It was clear who the messy artists were...and who were not...
Such a fun family activity
Happy Easter to you and we hope EB brought you lots of fun (and crafty) treats!!!


